OntoRich System Testing and User Guide V0.1
Contents
Application
Testing & User Manual for key features
Step 1: Subscribe to an IT related domain using OntoRich RSS
Reader application.
Step 3: Create new text corpus using e-mail content.
Step 6: Extract more terms using
predefined semantic relations( partOf, isKindOf)
Step 7: Extract terms using semantic hierarchies
Step 8: Instance Extraction using NLP (Natural Language
Processing) facilities.
Step 9: Obtain ontology metrics related to the entire
ontology schema
Step 10: Ontology metrics related to each ontology class
Step 11: Evolutional evaluation features
Web Services Installation and Deployment
The considered testing scenario traces a simple IT related ontology through the process of enrichment and evaluation provided by the OntoRich system.
The structure of the tested ontology can be seen in figure 1.
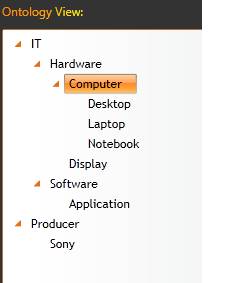
Figure 1: IT Ontology skeleton
Next we will describe all the testing scenarios applied to this ontology structure.
Step 1: Subscribe to an IT related domain using OntoRich RSS Reader application.
The user accesses the following URL: http://www.monitorizarestiri.ro/ontology/
After creating an account and logging in he can subscribe to one of the available RSS feeds domains. The result of subscribing to an IT related domain (‘laptops’ in this case) is illustrated in figure 2.
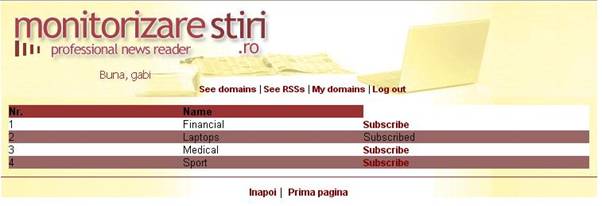
Figure 2: Subscribe Result
After subscribing to the domain the user will receive daily updates from the chosen area of interest by e-mail. The content of the email will be taken from the list of available providers (see figure 3).
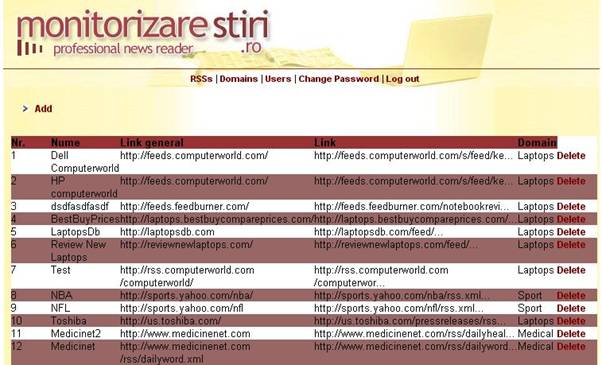
Figure 3: Available RSS feeds
After logging in with authenticated user, or register a new account for the OntoRich application, the user can choose to load an existing ontology from the local machine, or load one available on the WEB. (see figure 4)
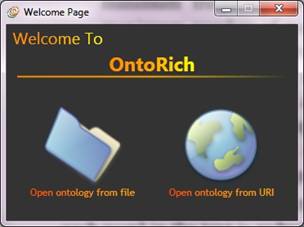
Figure 4: Choose ontology location
In order to start an ontology enrichment process on the considered ontology, the user has to define firs a content source where new terms can be found. In order to do this, a new text corpus has to be created, either from a local file, or from the e-mail received at step 1. The result of this step can be seen in figure 5.
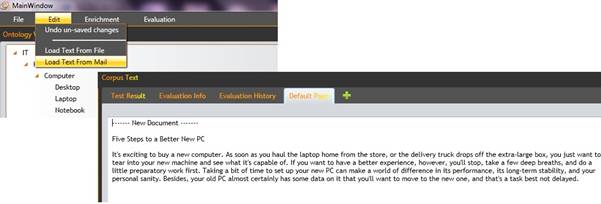
Figure 5: Load Text Corpus
The user will be prompted with a popup window, where he can input the desired parameters for term extraction (see figure 6).
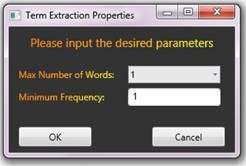
Figure 6: Term Extraction Parameters
The output for this term extraction configuration can be seen in figure 7.
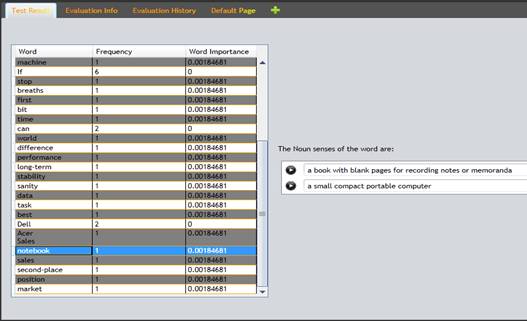
Figure 7: Term Extraction Results
The user selects one term from the term extraction result list, selects a parent class from the tree view where the new concept will be added, and then he clicks the “Add New Concept” button. The action, and the result of it can be seen in figure 8.
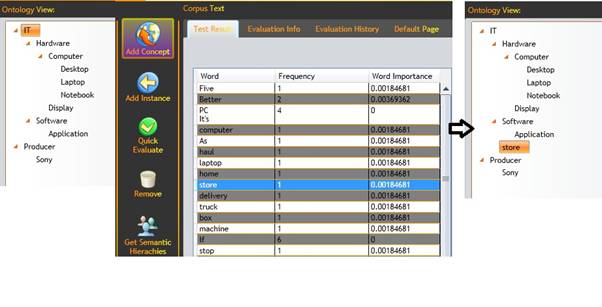
Figure 8: Add Concept
The same result can be obtained by selecting a class from the tree view and dragging an item from the result list onto the tree view.
Step 6: Extract more terms using predefined semantic relations( partOf, isKindOf)
More terms can be extracted using features provided by interfacing the WordNet library and using semantic relations that exist between word sets. A result for the considered ontology can be seen in figure 9. The resulting terms can be added as new concepts to the ontology by a simple drag and drop operation on the Tree View.
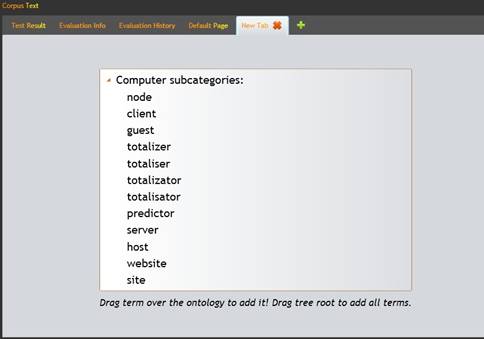
Figure 9: Semantic relations extractor
For a considered term a semantic hierarchy tree can be obtained by interfacing the WordNet functionality. The resulting tree is illustrated by figure 10.
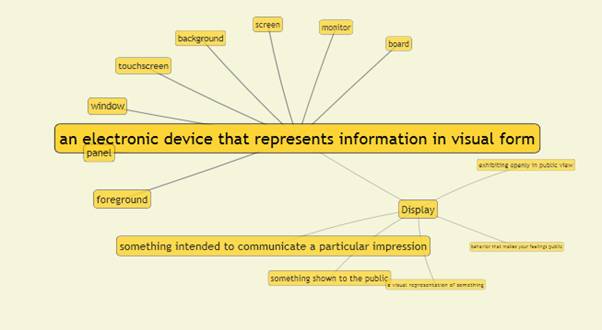
Figure 10: Semantic Hierarchy Tree
The user can obtain ontology instances using predefined models (Persons, Companies, Dates, etc…). The Result of extracting organization names from the text corpus is displayed in figure 11.
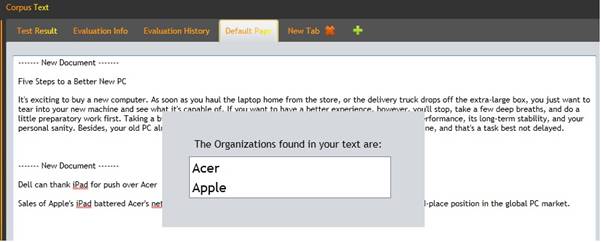
Figure 10: Extract Organization Names
Operations for add/delete of concept/instance/relation were tested and validated.
The testing continues with the evaluation part involving the considered ontology.
The metrics considered for the entire ontology schema were individually tested on the considered ontology. An example of a result obtained can be observed in figure 11.
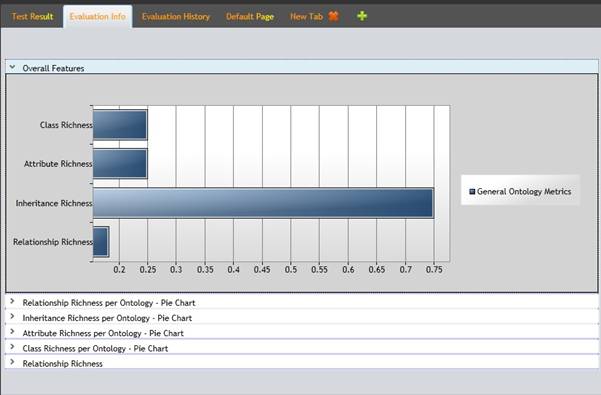
Figure 11: General Ontology Metrics for IT ontology
Each general metric can be individually seen in the form of a pie chart for detailed information. See figure 12.
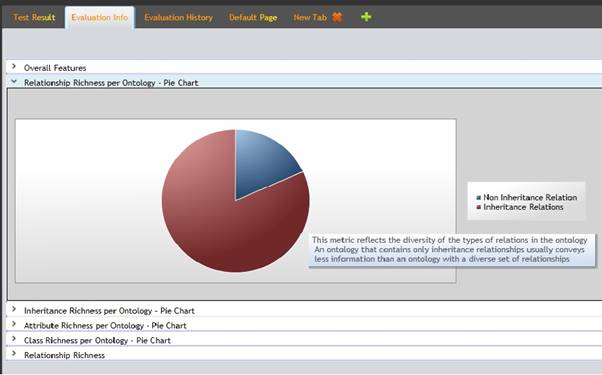
Figure 12: Relationship Richness for IT ontology
The user can also use metrics to evaluate each class in the ontology. The result obtained for Relationship Richness metric can be seen in figure 13 ( a more complex ontology , Wine ,was selected for this test case)
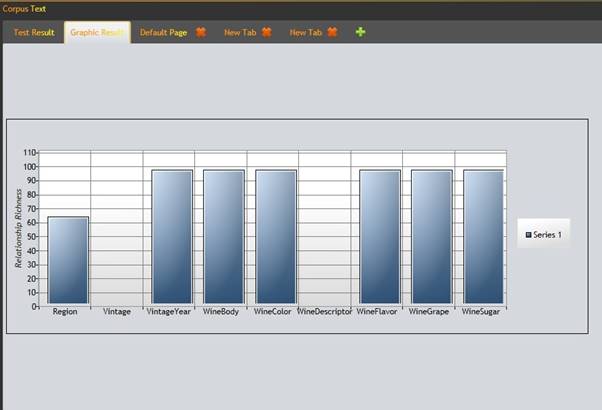
Figure 13: Relationship Richness metric for Wine ontology
After each modification made to the ontology the metrics can be updated. See figure 14 for an updated version of Relationship Richness for the Wine ontology.
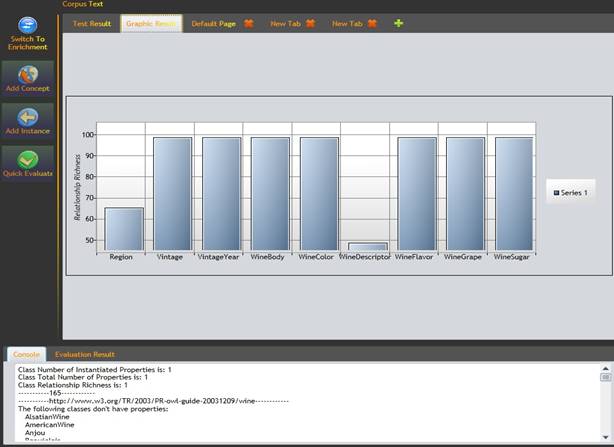
Figure 14: Updated Relationship Richness for Wine ontology
Each time a user evaluates the ontology the obtained results are stored into a database. This information can be later used to obtain an overview of the metrics evolution over a certain period. Figure 15 illustrates such an example.
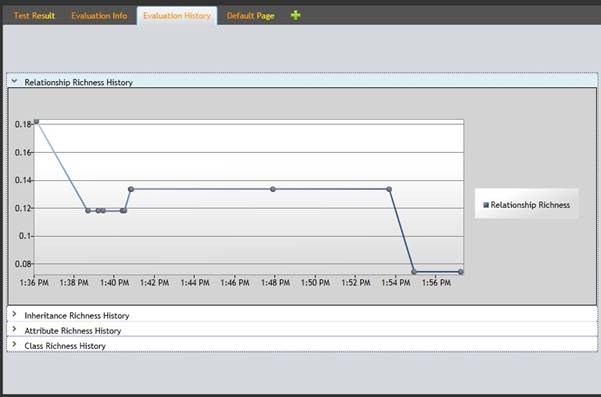
Figure 15: Relationship Richness evolution graph
In this section the main installation and configuration issues for the OntoRich System are addresed.
The RSS Reader is available online at the address: http://www.monitorizarestiri.ro/ontology/
The user needs to create an account with a valid e-mail address and subscribe to preferred domains.
There are 4 web services that need to run on the local machine or a machine from the local network in order for the application to work properly. The web services are contained in the WebServices.rar archive.
The web services are developed in Java programming language and the recommended configuration for deployment consists in using NetBeans IDE (available at http://netbeans.org/) and Glassfish Server 3 (included in NetBeans package).
The web services are based on four existing free-source Java APIs:
RiTa Word Net
The API is available at http://www.rednoise.org/rita/wordnet/documentation/index.htm.
OpenNLP
The API is available at http://opennlp.sourceforge.net/projects.html. The used models can be found at http://opennlp.sourceforge.net/models-1.5/ (use English Language models)
OWLAPI
The API is available at http://owlapi.sourceforge.net/ .
Pellet
The API is available at http://clarkparsia.com/pellet.
The core of OntoRich system is developed as a WPF application available in the OntoRichMain folder. It uses WPF Toolkit and WPF Toolkit Extended frameworks. The implementation was done with .NET Framework 4.0 and Visual Studio 2010 IDE.
Database
The database comes with the source files and in order to work, MsSQL Express 2005 Server is needed.
dotNetRDF
The core application uses dotNetRDF API as main tool for managing RDF/XML ontologies. The dotNetRDF API assemblies are found in the OntoRichMain folder, or online at http://www.dotnetrdf.org/.